Gradle で Kotlin/JS ライブラリを開発する
概要
Gradle を使用して Kotlin/JS の開発環境を構築し、Hello World を作成します。 更に、ライブラリとして配布可能にする方法、そのライブラリを使用する方法を説明します。 JavaScript のライブラリを使用する方法は別の記事で説明します。
なお、筆者は JavaScript 界については詳しくないので、誤りがあれば優しく教えてください。
目次
確認環境
- IntelliJ IDEA Community 2017.2
- Kotlin 1.1.3-2
- Gradle 3.5
- Groovy 2.4.10
参考情報
- Kotlin to JavaScript - Kotlin Programming Language
- 公式チュートリアル
- Dynamic Type - Kotlin Programming Language
- 公式リファレンス
- kotlin.js - Kotlin Programming Language
- 公式API
解説
環境構築
Gradle の kotlin2js plugin を使用して Kotlin/JS のコードをビルドする環境を構築する。
モジュール単位に js ファイルが生成されるため、複数のモジュールを作成する前提で構築する。
手順としては、空プロジェクトを作成し、モジュールを追加する。
モジュール名は sample として作成した。

初期設定
生成された sample/build.gradle は以下の通り。
group 'com.example'
version '1.0-SNAPSHOT'

buildscript {
    ext.kotlin_version = '1.1.3-2'

    repositories {
        mavenCentral()
    }
    dependencies {
        classpath "org.jetbrains.kotlin:kotlin-gradle-plugin:$kotlin_version"
    }
}

apply plugin: 'kotlin2js'

repositories {
    mavenCentral()
}

dependencies {
    compile "org.jetbrains.kotlin:kotlin-stdlib-js:$kotlin_version"
}
Sample.kt を src/main/kotlin に作成する。
fun main(args: Array<String>) {
    println("Hello World")
}
module root (例では sample ディレクトリ) にてビルドを実行。
$ ./gradlew build
HTML (sample/index.html) を作成する。HTML ではビルドにより生成された JavaScript を読み込む。
<!DOCTYPE html>
<html lang="ja">
<head>
    <meta charset="UTF-8">
    <title>サンプル</title>
</head>
<body>

<script src="build/classes/main/sample_main.js"></script>

</body>
</html>
ここまでに作成、および生成したファイルは以下の通り。(重要な部分のみ記載。)
sample <- module root
    build
        classes
            main
                sample_main
                    root-package.kjsm
                sample_main.js
                sample_main.meta.js
    src
        main
            java
            kotlin
                Sample.kt
            resources
        test
            java
            kotlin
            resources
    build.gradle
    index.html
ブラウザで表示すると kotlin モジュールが見つからずにエラーとなる。
kotlin.js の抽出
Gradle を使う場合には jar ファイルから js ファイルを抽出する必要がある。
sample/build.gradle に以下を追記する。
(参照 : http://kotlinlang.org/docs/tutorials/javascript/getting-started-gradle/getting-started-with-gradle.html)
build.doLast() {
    // Copy *.js from jar into build directory
    configurations.compile.each { File file ->
        copy {
            includeEmptyDirs = false

            from zipTree(file.absolutePath)
            into 'build/classes/main'
            include '**/*.js'
            eachFile { details ->
                def names = details.path.split('/')
                details.path = names.getAt(names.length - 1)
            }
        }
    }
}
HTML では kotlin.js を読み込ませる記述を sample_main.js の前に追記。
<script src="build/classes/main/kotlin.js"></script>
<script src="build/classes/main/sample_main.js"></script>
以上でブラウザのコンソールに Hello World が表示される。
パスの変更
ソースコードを配置するディレクトリと生成される JavaScript が配置されるディレクトリは階層が深い。 階層を減らすことで何らかの支障をきたすかもしれないが、 今回のサンプルの範囲では問題ないため、 配置するディレクトリを変更する。 (今回のサンプルでは、ソースセットには Kotlin ソースコード以外は置かず、テストを作成していないため問題ない。)
sample/build.gradle に以下を追記する。
sourceSets {
    main.kotlin.srcDirs += "src/main"
    test.kotlin.srcDirs += "src/test"
}

def outputDir = "${projectDir}/build/js"

compileKotlin2Js {
    kotlinOptions {
        outputFile = "${outputDir}/sample.js"
    }
}

build.doLast() {
    // Copy *.js from jar into build directory
    configurations.compile.each { File file ->
        copy {
            includeEmptyDirs = false

            from zipTree(file.absolutePath)
            into outputDir // 変更
            include '**/*.js'
            eachFile { details ->
                def names = details.path.split('/')
                details.path = names[names.length - 1]
            }
        }
    }
}
ファイルの配置は以下に変更される。
sample <- module root
    build
        js
            sample
                root-package.kjsm
            kotlin.js
            kotlin.meta.js
            sample.js
            sample.meta.js
    src
        main
            Sample.kt
        test
    build.gradle
    index.html
JavaScript の配置が変更されたので HTML (sample/index.html) の内容も変更する。
<script src="build/js/kotlin.js"></script>
<script src="build/js/sample.js"></script>
生成ファイル
ビルドすることで生成されるファイルは 3 種類ある。
*.js- モジュールの JavaScript ファイル
*.meta.js- Kotlin to JavaScript - Kotlin Programming Language
- リフレクションやその他の機能に使用されるメタファイル
- Kotlin to JavaScript - Kotlin Programming Language
*.kjsm- javascript - Kotlin: What is a kjsm file? - Stack Overflow
- Kotlin JavaScript Meta ファイル
- IDE で型チェックをするときに使用
- javascript - Kotlin: What is a kjsm file? - Stack Overflow
ライブラリ化
ビルドすることで jar ファイルが生成される。 jar ファイルには 3 種類のファイル (js, meta.js, kjsm) が全て含まれている。 kjsm ファイルが含まれていれば、IDE の型チェックが有効となる。
例えば、sample モジュールの main 関数を sayHello 関数に変更して、他のモジュール (sample-client モジュールを作成) から使用する。
まず、sample モジュールの Sample.kt を以下に変更する。
fun sayHello() {
    println("Hello World")
}
ライブラリ化する際には、依存している js ファイルを抽出する必要はない。
sample/build.gradle から以下の記述を無効化、もしくは削除する。
//build.doLast() {
//    // Copy *.js from jar into build directory
//    configurations.compile.each { File file ->
//        copy {
//            includeEmptyDirs = false
//
//            from zipTree(file.absolutePath)
//            into outputDir
//            include '**/*.js'
//            eachFile { details ->
//                def names = details.path.split('/')
//                details.path = names[names.length - 1]
//            }
//        }
//    }
//}
ビルドすると build/libs/sample-1.0-SNAPSHOT.jar が生成される。
次に、sample-client モジュールを作成し、sample モジュールと同様に設定する。
jar の依存関係を追加すると sample-client/build.gradle は以下の通りになる。
buildscript {
    ext.kotlin_version = '1.1.3-2'

    repositories {
        mavenCentral()
    }
    dependencies {
        classpath "org.jetbrains.kotlin:kotlin-gradle-plugin:$kotlin_version"
    }
}

apply plugin: 'kotlin2js'

repositories {
    mavenCentral()
    // 追加
    flatDir {
        dirs '../sample/build/libs'
    }
    // ^^^
}

dependencies {
    compile "org.jetbrains.kotlin:kotlin-stdlib-js:$kotlin_version"
    compile "com.example:sample:1.0-SNAPSHOT" // 追加
    //compile 'com.example:sample:1.0-SNAPSHOT' // error!
}

sourceSets {
    main.kotlin.srcDirs += "src/main"
    test.kotlin.srcDirs += "src/test"
}

def outputDir = "${projectDir}/build/js"

compileKotlin2Js {
    kotlinOptions {
        outputFile = "${outputDir}/sample-client.js" // 変更
    }
}

build.doLast() {
    // Copy *.js from jar into build directory
    configurations.compile.each { File file ->
        copy {
            includeEmptyDirs = false

            from zipTree(file.absolutePath)
            into outputDir
            include '**/*.js'
            eachFile { details ->
                def names = details.path.split('/')
                details.path = names[names.length - 1]
            }
        }
    }
}
SampleClient.kt を以下の内容で作成する。
build/libs/sample-1.0-SNAPSHOT.jar に含まれる kjsm ファイルのおかげで補完機能が有効になっている。
fun main(args: Array<String>) {
    sayHello()
}
HTML ファイル (sample-client/index.html) を作成して JavaScript ファイルを読み込む。
sample-client.js の前に kotlin.js と sample.js を読み込む必要がある。
<!DOCTYPE html>
<html lang="ja">
<head>
    <meta charset="UTF-8">
    <title>サンプル</title>
</head>
<body>

<script src="build/js/kotlin.js"></script>
<script src="build/js/sample.js"></script>
<script src="build/js/sample-client.js"></script>

</body>
</html>
ここまでに作成/生成したファイルを整理すると以下になる。
sample-client <- module root
    build
        js
            sample-client
                root-package.kjsm
            kotlin.js
            kotlin.meta.js
            sample.js
            sample.meta.js
            sample-client.js
            sample-client.meta.js
    src
        main
            SampleClient.kt
        test
    build.gradle
    index.html
sample-client/index.html をブラウザで開くと、ブラウザのコンソールに Hello World が表示される。
依存関係管理
HTML に script タグを並べることで各種のライブラリを使用できるが、記述順を気にする必要がある。
依存関係の管理を楽にするために、JavaScript のモジュールシステムを使用する。
Kotlin/JS が対応している JavaScript モジュールシステム (moduleKind) は以下の 4 つ。
(参照 : JavaScript Modules - Kotlin Programming Language)
- plain
- モジュールシステムを使わない
- amd
- Asynchronous Module Definition (AMD) に対応させる
- require.js ライブラリで使用する
- commonjs
- CommonJS に対応させる
- node.js/npm で使用する
- umd
ライブラリに JavaScript モジュールシステムを適用する
UMD を使用すればいずれのモジュールシステムにも対応できるので、UMD を指定してビルドする。
sample と sample-client の両方の build.gradle に moduleKind を追加する。
compileKotlin2Js {
    kotlinOptions {
        outputFile = "${outputDir}/sample-client.js"
        moduleKind = "umd" // 追加
    }
}
ビルドして生成された JavaScript ファイル (sample.js, sample-client.js) の冒頭には以下の様な記述が加えられる。
moduleKind = "plain" の場合 :
if (typeof kotlin === 'undefined') {
  throw new Error("Error loading module 'sample-client'. Its dependency 'kotlin' was not found. Please, check whether 'kotlin' is loaded prior to 'sample-client'.");
}
if (typeof sample === 'undefined') {
  throw new Error("Error loading module 'sample-client'. Its dependency 'sample' was not found. Please, check whether 'sample' is loaded prior to 'sample-client'.");
}
this['sample-client'] = function (_, Kotlin, $module$sample) {
  ...snip...
  return _;
}(typeof this['sample-client'] === 'undefined' ? {} : this['sample-client'], kotlin, sample);
Global オブジェクトに kotlin, sample, sample-client を登録している。
moduleKind = "umd" の場合 :
(function (root, factory) {
  if (typeof define === 'function' && define.amd)
    define(['exports', 'kotlin', 'sample'], factory);
  else if (typeof exports === 'object')
    factory(module.exports, require('kotlin'), require('sample'));
  else {
    if (typeof kotlin === 'undefined') {
      throw new Error("Error loading module 'sample-client'. Its dependency 'kotlin' was not found. Please, check whether 'kotlin' is loaded prior to 'sample-client'.");
    }
    if (typeof sample === 'undefined') {
      throw new Error("Error loading module 'sample-client'. Its dependency 'sample' was not found. Please, check whether 'sample' is loaded prior to 'sample-client'.");
    }
    root['sample-client'] = factory(typeof this['sample-client'] === 'undefined' ? {} : this['sample-client'], kotlin, sample);
  }
}(this, function (_, Kotlin, $module$sample) {
  ...snip...
  return _;
}));
typeof define === 'function' && define.amd に該当すれば AMD、
typeof exports === 'object' に該当すれば CommonJS、
それ以外であればモジュールシステム無しと判断している。
JavaScript モジュールシステムを使い、読み込む
AMD を使用して依存関係を管理する。
AMD を使用するために require.js を導入する。
(CommonJS も少しだけ調べたけれどブラウザで使用するには複雑に見えたので、AMD だけを記載。)
sample-client/build.gradle に以下を追記する。
dependencies {
    compile "org.jetbrains.kotlin:kotlin-stdlib-js:$kotlin_version"
    compile "com.example:sample:1.0-SNAPSHOT"
    compile 'org.webjars:requirejs:2.3.3' // 追加
}
ビルドすることで build/js/require.js が展開される。
require.js を使うにあたって設定ファイル (require-config.js) を作成しておく。
(参照 : RequireJS API)
var require = {
    baseUrl: 'build/js',
    enforceDefine: true,
};
設定の内容は以下のとおり。
build/js以下にある JavaScript ファイルを読み込む (baseUrl)- JavaScript の読み込みに失敗したときはエラーとする (
enforceDefine)
次に、require.js を使用するように HTML (sample-client/index.html) を変更する。
<script src="require-config.js"></script>
<script src="build/js/require.js"></script>
<script>require(['sample-client']);</script>
sample-client を指定することで、sample-client が依存している kotlin と sample が読み込まれる。
読み込み先は require-config.js で指定されている。
sample, sample-client のいずれでも依存関係は Gradle に集約できている点が嬉しい。
最後に、ブラウザで開くとブラウザのコンソールに Hello World が表示される。
おまけ
sample-client は読み込むだけで main 関数が実行されてしまう。
再利用性の観点からは望ましくない。
SampleClient.kt は以下に変更する。
fun run() {
    sayHello()
}
sample-client/index.html は以下に変更する。
<script src="require-config.js"></script>
<script src="build/js/require.js"></script>
<script>
require(['sample-client'], function(client) { client.run(); });
</script>
ソースコード
Google App Engine スタンダード環境で Kotlin + Spring Boot を動かす
概要
2017.6.28 に Google App Engine スタンダード環境が Java8 をサポートしたと告知されました。 告知記事を読んでいると Kotlin + Spring Boot で動かすサンプルが目にとまったので、動かしてみました。
確認環境
- macOS 10.12.5
- Google Cloud SDK 161.0.0
- 158.0.0 でインストール後にアップデート
- App Engine Java 1.9.54
- IntelliJ IDEA Community 2017.1.4
参考情報
- Google Cloud Platform Blog: Google App Engine standard now supports Java 8
- 告知記事
- getting-started-java/appengine-standard-java8/kotlin-springboot-appengine-standard at master · GoogleCloudPlatform/getting-started-java · GitHub
- Google App Engine + Kotlin + Spring Boot のサンプル
- Gradle と App Engine プラグインを使用する | Java の App Engine スタンダード環境 | Google Cloud Platform
- Gradle で環境構築するための方法
解説
Google Cloud Platform
- プロジェクトを作成
(設定手順をメモしていませんでした…。)
Google Cloud SDK
手順は以下の通り。
ダウンロード後、ファイルの SHA256 チェックサムを検証してからファイルを展開。
install.sh を実行する前に好みのディレクトリに配置する。
筆者はユーザーのホームディレクトリに置いている (/Users/user_name/google-cloud-sdk) 。
install.sh を実行することで、インストール済みコンポーネントを確認でき、コンポーネントのインストール/アンインストール方法を知れる。
また、環境変数 PATH の自動設定を行える。
$ echo "6572e086d94ab2a6b3242a966b688a382a80a417101315d59d38ac804b5a366e  google-cloud-sdk-158.0.0-darwin-x86_64.tar.gz" | shasum -a 256 -c
google-cloud-sdk-158.0.0-darwin-x86_64.tar.gz: OK
$ tar xvfz google-cloud-sdk-158.0.0-darwin-x86_64.tar.gz
$ cd google-cloud-sdk
$ ./install.sh
...
Do you want to help improve the Google Cloud SDK (Y/n)?
...
Modify profile to update your $PATH and enable shell command
completion?

Do you want to continue (Y/n)?
...
[/Users/user_name/.bash_profile]:
...
途中の Y/n は全て初期設定 (Enter) を選択。~/.bash_profile にて PATH の設定が追加される。
Terminal を起ち上げ直して、以下を続行。 Java Extension コンポーネントをインストールして、SDK をアップデートする。 その後にアカウントを初期化する。
$ gcloud components install app-engine-java
$ gcloud components update
$ gcloud init
...
You must log in to continue. Would you like to log in (Y/n)?
...
Please enter numeric choice or text value (must exactly match list
item):  google_cloud_platform_project_id
...
API [compute-component.googleapis.com] not enabled on project
[xxxxxxxxxxx]. Would you like to enable and retry?  (Y/n)?
...
途中の Y/n は初期設定 (Enter) を選択。ブラウザが起動して認証を求められる。
SDK の設定諸々は以下のコマンドで確認できる。
$ gcloud info
...
Installation Root: [/Users/user_name/google-cloud-sdk]
...
IntelliJ IDEA でプロジェクト作成
- Gradle Project を作成
- appengine-web.xml 作成
- Java8 スタンダード環境を指定
- build.gradle 作成
- Application.kt 作成
- JsonObjectMapper の設定
- TemplateEngine の設定
- JsonObjectMapper 作成
- Controller, Template などを作成 (省略)
- appengineRun タスクで実行
- ローカル環境で動かす
- appengineDeploy タスクで配置
- Google の環境で動かす
appengine-web.xml, build.gradle, Application.kt, JsonObjectMapper は以下の Gist を参照のこと。
Google App Engine Standard Environment in Java8 wi …
Serializer/Deserializer クラスは ObjectMapper の addSerializer/addDesirializer メソッドに型を合わせるために用意している。
IntelliJ IDEA の Terminal にて、以下を実行すればローカル環境で試せる。
$ ./gradlew appengineRun
...
 04, 2017 4:56:51 午前 com.google.appengine.tools.development.AbstractModule startup
情報: Module instance default is running at http://localhost:8080/
7 04, 2017 4:56:51 午前 com.google.appengine.tools.development.AbstractModule startup
情報: The admin console is running at http://localhost:8080/_ah/admin
7 04, 2017 1:56:51 午後 com.google.appengine.tools.development.DevAppServerImpl doStart
情報: Dev App Server is now running
http://localhost:8080/ をダブルクリックで選択し、コンテキストメニューの Open as URL を選択するとブラウザで開ける。
(もっと楽に起動できる方法は?)
同じく、以下を実行すれば Google Cloud Platform 環境に配置される。
$ ./gradlew appengineDeploy
...
配置後、gcloud app browser とすることでデフォルトブラウザが開くが、デフォルトブラウザの設定が不明。
OS のデフォルトは Chrome に設定されているのに、Firefox が開く。
(どこに設定が?)
他の設定もしていた build.gradle から余計な設定を削除したため、もしかしたら削除し過ぎていて問題が起こるかも。 IntelliJ IDEA に Google Cloud Tools plugin をインストールしているが、無くてもよいはずなので記載していない。 Google Cloud Tools を使うことで App Engine に配置できるはずが機能しない。 (何か設定しないとだめ?)
IntelliJ IDEA で Emacs 風キーマップを作る
概要
IntelliJ IDEA の keymap 設定を Emacs にしても、使いたい機能のショートカットが複雑で覚えられません。 そこで、Emacs 風のショートカットに設定を変更します。
筆者は最初に覚えたエディタが Emacs でしたが、その後は Emacs のライトユーザーです。 ヘビーユーザーからしたら Emacs 風ではないと思われるかもしれません。
確認環境
- IntelliJ IDEA Community 2017.1.4
参考情報
解説
Emacs と言えば、ESC キーと Ctrl キーから連なるショートカットが特徴的かと思います。
IntelliJ IDEA ではショートカットキーに Second stroke を設定することにより、
Emacs 風のショートカットキーを設定できます。
私は、Ctrl-[ を ESC キーとして使用しています(Emacs 標準のはず)。
そのため、Ctrl-[, Ctrl-x, Ctrl-c, Ctrl-h には Second stroke を設定しています。
Ctrl-x と Ctrl-c で使い分けがあったかもしれませんが無視することにして設定しています。
Ctrl-h はヘルプ系のアクションを割り当てています。
また、Emacs とは異なりますが、Navigation 系のアクションを Ctrl-j (Jump のつもり) に割り当てています。
基本的には、アクションの意味を表すようにキーを選択しているつもりです(Project ならば p, Intention なら i とか)。
使用頻度の低いと思われるアクションは Ctrl-[ x で Find Action を起動して実行する方針です。
設定した内容を整理したスプレッドシートを公開しています。 設定を変更していないアクションについては記載していません。
アクションの一覧は intellJ IDEA Community のソースコードから取得しています。
intellij-community/ActionsBundle.properties at master · JetBrains/intellij-community · GitHub
IntellJ IDEA の便利機能をまだまだ知らないので、こんな便利機能があるよ!という話があれば伺いたいです。 また、Emacs の標準的なショートカットキーで、このキー設定は鉄板!という話があれば伺いたいです。
libGDX で iOS アプリを起動できない
概要
libGDX で Multi-OS Engine を使用した iOS アプリを起動するとエラーが発生しました。 libGDX が初期設定で指定している Multi-OS Engine は 1.2.3 ですが 1.2.5 に変更する必要があります。
確認環境
- AndroidStudio 2.2.3
- libGDX 1.9.5
- Multi-OS Engine 1.2.3
- Xcode 8.2.1
参考情報
解説
Intel Multi-OS Engine 1.2.3 で実行すると以下のエラーが表示される。
Terminating app due to uncaught exception 'NSInvalidArgumentException'
build.gradle で moe-gradle のバージョンを 1.2.5 にすると解決する。
classpath 'org.multi-os-engine:moe-gradle:1.2.5'
libGDX 2D UI Library - Widgets
概要
libGDX の 2D UI Library のうち、Button 系以外の Widget についてまとめます。
目次
確認環境
- OS X El Capitan (10.11.6)
- Xcode 8.0
- Android Studio 2.2.2
- Multi-OS Engine Plugin 1.2.1
- Kotlin 1.0.4
- buildToolVersion 25.0.0
- compileSdkVersion 24
- libGDX 1.9.5-SNAPSHOT
参考情報
- Scene2d · libgdx/libgdx Wiki · GitHub
- Scene2d 公式文書。
- Viewports · libgdx/libgdx Wiki · GitHub
- Viewport 公式文書。
- Scene2d.ui · libgdx/libgdx Wiki · GitHub
- Scene2d UI 公式文書。
- libGDXの基礎5 Scene2Dを使う - Qiita
- 概要。
解説
Image
| 設定項目 | 型 | 説明 |
|---|---|---|
| drawable | Drawable | 描画対象 |
| Skin, String | ||
| NinePatch | ||
| Texture | ||
| TextureRegion | ||
| scaling | Scaling | Scaling.none, Scaling.fit, Scaling.fill, Scaling.stretch (default)。(fill, stretch には X, Y のみがある。) |
| align | Int | Align.topLeft, Align.top, Align.topRight, Align.right, Align.bottomRight, Align.bottom, Align.bottomLeft, Align.left, Align.center (default)。 |
サイズ
| min | pref | max | |
|---|---|---|---|
| width/height | 0 | drawable のサイズ | 0 |
Scaling (align = Align.center の場合)

| Scaling.none | Scaling.fit |
|---|---|
 |
 |
| Scaling.fill | Scaling.stretch |
 |
 |
サンプルコード
    private val actor by lazy {
        Image(Texture("badlogic.jpg")).apply {
            width = this@MyGdxGame.stage.width
            height = this@MyGdxGame.stage.height
            setScaling(Scaling.none)
            //setScaling(Scaling.fit)
            //setScaling(Scaling.fill)
            //setScaling(Scaling.stretch)
            setAlign(Align.center)
        }
    }

    override fun create() {
        ...
        stage.addActor(actor)
    }
Label
| 設定項目 | 型 | 説明 |
|---|---|---|
| text | CharSequence | 描画対象。改行文字 ('\n') で改行される。 |
| style | Label.LabelStyle | background, font, fontColor |
| Skin | ||
| labelAlign | Int | Label 全体の配置。Align.topLeft, Align.top, Align.topRight, Align.right, Align.bottomRight, Align.bottom, Align.bottomLeft, Align.left (default), Align.center。 |
| lineAlign | Int | 各行の配置。Align.left (default), Align.center, Align.right。 |
| ellipsis | Boolean | true ならば width を超えないように末尾を "..." に置き換える。(default: false) |
| String | null 以外ならば width を超えないように末尾を指定した String に置き換える。 | |
| fontScaleX | Float | X 方向の拡大率。 |
| fontScaleY | Float | Y 方向の拡大率。 |
| wrap | Boolean | true ならば width を超える場合に改行する。ellipsis が優先される。(default: false) |
サイズ
| min | pref | max | |
|---|---|---|---|
| width/height | prefと同じ | text が収まるサイズを算出 | 0 |
text = "Hello World\nHello Beautiful World!!"、fontScaleX = 5、fontScaleY = 10 の場合の表示例。
| labelAlign = topLeft, lineAlign = center | labelAlign = center, lineAlign = center | labelAlign = bottomRight, lineAlign = center |
|---|---|---|
 |
 |
 |
| labelAlign = center, lineAlign = left | labelAlign = center, lineAlign = center | labelAlign = center, lineAlign = right |
|---|---|---|
 |
 |
 |
サンプルコード
    private val actor by lazy {
        Label("Hello World\nHello Beautiful World!!",
                Label.LabelStyle(BitmapFont(), Color.WHITE)).apply {
            width = this@MyGdxGame.stage.width
            height = this@MyGdxGame.stage.height
            setFontScale(5f, 10f)
            setAlignment(Align.center, Align.center)
        }
    }

    override fun create() {
        ...
        stage.addActor(actor)
    }
TextField
| 設定項目 | 型 | 説明 |
|---|---|---|
| text | String | 入力欄に設定される文字列。改行文字 ('\n') は除去される。 |
| style | TextField.TextFieldStyle | BitmapFont (font, messageFont), Color (fontColor, messageFontColor, disabledFontColor, focusedFontColor), Drawable (background, disabledBackground, focusedBackground, cursor, selection) |
| Skin | ||
| alignment | Int | Align.left, Align.center, Align.right。 |
| maxLength | Int | 入力可能文字数。 |
| messageText | String | text 未入力時に表示する文字列。入力を削除しても再表示されない。 |
| onlyFontChars | Boolean | true (default) ならば、text に set する際に BitmapFont に含まれない文字を除去する。false ならば、含まれない文字を空白に置き換える。 |
| passwordMode | Boolean | true ならば、入力文字列を passwordCharacter で表示する。false (default) ならば、入力文字列をそのまま表示する。 |
| passwordCharacter | Char | passwordMode が true のときに使用する文字。設定しないと passwordMode = true でもマスクされない。 |
サイズ
| min | pref | max | |
|---|---|---|---|
| width/height | prefと同じ | ? | 0 |
サンプルコード
    private val actor by lazy {
        TextField("", TextField.TextFieldStyle().apply {
            font = BitmapFont().apply {
                data.scale(10f)
            }
            messageFont = font
            fontColor = Color.WHITE
            messageFontColor = Color.RED
        }).apply {
            width = this@MyGdxGame.stage.width
            height = this@MyGdxGame.stage.height
            maxLength = 10
            messageText = "message"
            isPasswordMode = false
            setPasswordCharacter('x')
            setAlignment(Align.right)
            setOnlyFontChars(false)
            //text = "aとbとc"
        }
    }

    override fun create() {
        ...
        stage.addActor(actor)
    }
TextArea
TextField と同様。 異なる点は text に改行文字を含むことができ、width を超える場合には改行して表示される。
List
| 設定項目 | 型 | 説明 |
|---|---|---|
| items | Array |
リストの項目。文字列として表示される。 |
| style | List.ListStyle | BitmapFont (font), Color (fontColorSelected, fontColorUnselected), Drawable (background, selection) |
| Skin |
サイズ
| min | pref | max | |
|---|---|---|---|
| width/height | prefと同じ | ? | 0 |
実行例

サンプルコード
    private val actor by lazy {
        List<String>(List.ListStyle().apply {
            font = BitmapFont().apply {
                data.scale(10f)
            }
            fontColorUnselected = Color.WHITE
            fontColorSelected = Color.RED
            selection = SpriteDrawable(Sprite(Texture("badlogic.jpg")))
        }).apply {
            width = this@MyGdxGame.stage.width
            height = this@MyGdxGame.stage.height
            setItems("pen", "apple", "pineapple")
        }
    }

    override fun create() {
        ...
        stage.addActor(actor)
    }
SelectBox
| 設定項目 | 型 | 説明 |
|---|---|---|
| items | Array |
リストの項目。文字列として表示される。 |
| style | SelectBox.SelectBoxStyle | BitmapFont (font), Color (fontColor, disabledFontColor), Drawable (background, backgroundOpen, backgroundOver, backgroundDisabled), List.ListStyle (BitmapFont (font), Color (fontColorSelected, fontColorUnselected), Drawable (background, selection)), ScrollPane.ScrollPaneStyle (Drawable (background, corner, hScroll, hScrollKnob, vScroll, vScrollKnob)) |
| Skin | ||
| maxListCount | Int | ドロップダウン時に表示する項目数。(default: items の要素数) |
| scrollingDisabled | Boolean | true ならば、ドロップダウン時のスクロールを無効にする (maxListCount の個数しか表示されない)。false (default) ならば、有効にする。 |
サイズ
| min | pref | max | |
|---|---|---|---|
| width/height | prefと同じ | ? | 0 |
実行例
| default | maxListCount = 3 | maxListCount = 3, scrollingDisabled = true |
|---|---|---|
 |
 |
 |
サンプルコード
    private val actor by lazy {
        val commonFont = BitmapFont().apply {
            data.scale(10f)
        }
        SelectBox<String>(SelectBox.SelectBoxStyle().apply {
            font = commonFont
            fontColor = Color.WHITE
            background = SpriteDrawable(Sprite(Texture("badlogic.jpg")).apply {
                color = Color.YELLOW
            })
            backgroundOpen = SpriteDrawable(Sprite(Texture("badlogic.jpg")).apply {
                color = Color.GRAY
            })
            listStyle = List.ListStyle().apply {
                font = commonFont
                fontColor = Color.GRAY
                fontColorUnselected = Color.GREEN
                fontColorSelected = Color.RED
                selection = SpriteDrawable(Sprite(Texture("badlogic.jpg")).apply {
                    color = Color.RED
                })
            }
            scrollStyle = ScrollPane.ScrollPaneStyle().apply {
                vScroll = SpriteDrawable(Sprite(Texture("badlogic.jpg")).apply {
                    color = Color.BLUE
                })
                vScrollKnob = SpriteDrawable(Sprite(Texture("badlogic.jpg")).apply {
                    color = Color.MAGENTA
                })
            }
        }).apply {
            val stageW = this@MyGdxGame.stage.width
            val stageH = this@MyGdxGame.stage.height
            setPosition(stageW/2 - width/2, stageH - height)
            setItems("1", "2", "3", "4", "5", "6", "7", "8", "9", "0")
            //maxListCount = 3
            //setScrollingDisabled(true)
        }
    }

    override fun create() {
        ...
        stage.addActor(actor)
    }
ProgressBar
| 設定項目 | 型 | 説明 |
|---|---|---|
| min | Float | 最小値。 |
| max | Float | 最大値。 |
| stepSize | Float | 最小値から最大値を分割したときの一区画のサイズ。value は近くの区画に丸められる。 |
| vertical | Boolean | true ならば、縦方向に表示。false ならば、横方向に表示。 |
| style | ProgressBar.ProgressBarStyle | Drawable (background, knob, knobBefore, knobAfter, disabledBackground, disabledKnob, disabledKnobBefore, disabledKnobAfter) |
| Skin | ||
| visualInterpolation | Interpolation | value に set して、表示が更新される際のアニメーション表示方法。 |
| animateDuration | Float | アニメーション時間。単位は秒。 |
| animateInterpolation | Interpolation | setAnimationDuration を実行した際に行われるアニメーションの表示方法。 |
サイズ
| min | pref | max | |
|---|---|---|---|
| width/height | prefと同じ | ? | 0 |
実行例
| vertical = false | vertical = true |
|---|---|
 |
 |
サンプルコード
    private val actor by lazy {
        ProgressBar(0f, 100f, 25f, false,
                ProgressBar.ProgressBarStyle().apply {
                    background = SpriteDrawable(Sprite(Texture("badlogic.jpg")).apply {
                        color = Color.WHITE
                    })
                    knob = SpriteDrawable(Sprite(Texture("badlogic.jpg")).apply {
                        color = Color.BLUE
                    })
                    knobBefore = SpriteDrawable(Sprite(Texture("badlogic.jpg")).apply {
                        color = Color.RED
                    })
                    knobAfter = SpriteDrawable(Sprite(Texture("badlogic.jpg")).apply {
                        color = Color.GREEN
                    })
                }
        ).apply {
            width = this@MyGdxGame.stage.width
            height = this@MyGdxGame.stage.height
            setVisualInterpolation(Interpolation.fade)
            setAnimateDuration(10f)
            value = 60f
            setAnimateInterpolation(Interpolation.bounce)
            setAnimateDuration(20f)
        }
    }

    override fun create() {
        ...
        stage.addActor(actor)
    }
Slider
ProgressBar のサブクラス。
| 設定項目 | 型 | 説明 |
|---|---|---|
| min | Float | 最小値。 |
| max | Float | 最大値。 |
| stepSize | Float | 最小値から最大値を分割したときの一区画のサイズ。value は近くの区画に丸められる。 |
| vertical | Boolean | true ならば、縦方向に表示。false ならば、横方向に表示。 |
| style | Slider.SliderStyle | Drawable (background, knob, knobBefore, knobAfter, knobDown, knobOver, disabledBackground, disabledKnob, disabledKnobBefore, disabledKnobAfter) |
| Skin | ||
| visualInterpolationInverse | Interpolation | value に現在の value よりも小さい値を set して、表示が更新される際のアニメーション表示方法。 |
サイズ
| min | pref | max | |
|---|---|---|---|
| width/height | prefと同じ | ? | 0 |
サンプルコード
    private val actor by lazy {
        Slider(0f, 100f, 25f, false,
                Slider.SliderStyle().apply {
                    background = SpriteDrawable(Sprite(Texture("badlogic.jpg")).apply {
                        color = Color.WHITE
                    })
                    knob = SpriteDrawable(Sprite(Texture("badlogic.jpg")).apply {
                        color = Color.BLUE
                    })
                    knobBefore = SpriteDrawable(Sprite(Texture("badlogic.jpg")).apply {
                        color = Color.RED
                    })
                    knobAfter = SpriteDrawable(Sprite(Texture("badlogic.jpg")).apply {
                        color = Color.GREEN
                    })
                    knobDown = SpriteDrawable(Sprite(Texture("badlogic.jpg")).apply {
                        color = Color.MAGENTA
                    })
                }
        ).apply {
            width = this@MyGdxGame.stage.width
            height = this@MyGdxGame.stage.height
            value = 60f
            setVisualInterpolationInverse(Interpolation.smooth)
            setAnimateDuration(3f)
            value = 10f
        }
    }

    override fun create() {
        ...
        stage.addActor(actor)
    }
GPIO 操作するプログラムを macOS で開発する
概要
macOS 環境で RPi.GPIO モジュールを使用します。 macOS 環境では GPIO が存在しないため、エミュレーターを使用します。 なお、エミュレーターは自作です。
確認環境
- Raspberry Pi Zero
- RASPBIAN JESSIE LITE 2016-11-25
- Python 3.4.2
- MacBook Pro 2016 Late
参考情報
- Raspberry Pi GPIO Emulator | Roderick Vella Galea
- Raspberry Pi GPIO Emulator
- GitHub - nosix/raspberry-gpio-emulator: RPi.GPIO emulator
- 自作の RPi.GPIO Emulator
前回の記事
解説
Raspberry Pi には RPi.GPIO モジュールがインストールされているが、macOS 環境にはインストールされていない。 例えば、以下のプログラムを macOS 環境の PyCharm で作成すると No module named RPi とのエラーメッセージが表示される。
hello_gpio.py
from time import sleep

import RPi.GPIO as GPIO

GPIO.setmode(GPIO.BCM)
GPIO.setup(25, GPIO.OUT)

while True:
    GPIO.output(25, GPIO.HIGH)
    sleep(0.5)
    GPIO.output(25, GPIO.LOW)
    sleep(0.5)
macOS 環境に RPi モジュールをインストールする代わりに RPi モジュールのエミュレーター(もしくは、シミュレーター)を探した。 いくつか見つかったが、モジュール名を変更しなければいけないなど、ソースコード(上記の例では hello_gpio.py)に全く手を入れずに使えるものではなかった。そこで、RPi モジュールのエミュレーターを自作した。
RPi.GPIO エミュレーターをインストールする
GitHub にある Python パッケージを pip を使って仮想環境にインストール。
mac:~ nosix$ source ~/pyenv/python3/bin/activate
(python3) mac:~ nosix$
(python3) mac:~ nosix$ pip install git+https://github.com/nosix/raspberry-gpio-emulator/
Collecting git+https://github.com/nosix/raspberry-gpio-emulator/
  Cloning https://github.com/nosix/raspberry-gpio-emulator/ to /private/var/folders/kz/wv_kdss90634rlck2k9d852m0000gn/T/pip-6akufwi3-build
Installing collected packages: RPi
  Running setup.py install for RPi ... done
Successfully installed RPi-0.1.0
インストールが完了するとエラーは消える。
macOS 環境、Raspberry Pi 環境のいずれでも変更なしで実行できる。
macOS 環境で実行した場合には、エミュレーターが起動されてピンの状態を表示。


Raspberry Pi 環境で実行した場合には、GPIO が操作される。

なお、エミュレーターの UI が気に入らない場合には、自作 UI に差し替えられる設計になっている。 また、各 GPIO の状態変化を監視するプラグインを追加できる様になっている。
macOS で Python プログラム開発環境を構築して Raspberry Pi で実行する
概要
macOS で Python プログラムの開発環境を構築します。 macOS で作成したプログラムを Raspberry Pi で実行できる様にします。 前回の記事の続きです。
確認環境
- Raspberry Pi Zero
- RASPBIAN JESSIE LITE 2016-11-25
- Python 3.4.2
- MacBook Pro 2016 Late
参考情報
- パッケージ管理システム Homebrew - Qiita
- macOS のパッケージ管理ツール HomeBrew
前回の記事
解説
Python3 環境を構築する
HomeBrew が導入されていなければ導入する。 HomeBrew は macOS においてソフトウェアパッケージを管理するツール。 ソフトウェアパッケージのインストール、アンインストール、アップグレードなどを行うことができる。
mac:~ nosix$ /usr/bin/ruby -e "$(curl -fsSL https://raw.githubusercontent.com/Homebrew/install/master/install)"
brew コマンドを使用して Python3, virtualenv をインストール。 pip は Python パッケージを管理するツール。 Python プログラムで使用できる便利な機能 (ライブラリ) をインストールするために使用する。 virtualenv は仮想環境(実験室)を作成するツール。 Python バージョンやライブラリの組み合わせを切り替えることが容易になる。
mac:~ nosix$ brew install python3
mac:~ nosix$ pip3 install virtualenv
pip を使用した際に新しいバージョンの通知がある場合は、指示に従ってアップグレードする。
You are using pip version 8.1.2, however version 9.0.1 is available.
You should consider upgrading via the 'pip install --upgrade pip' command.
mac:~ nosix$ pip3 install --upgrade pip
Python3 用の virtualenv (仮想環境) を作成する。 作成後に --version オプションを指定して python コマンドを実行し、バージョンを確認する。
mac:~ nosix$ mkdir ~/pyenv
mac:~ nosix$ virtualenv -p python3 ~/pyenv/python3
mac:~ nosix$ source ~/pyenv/python3/bin/activate
(python3) mac:~ nosix$
(python3) mac:~ nosix$ python --version
Python 3.5.2
PyCharm を導入する
PyCharm Community をダウンロードし、インストール。 もしくは、IntelliJ IDEA など JetBarins 製 IDE を使用しているならば、Python Community Edition プラグインをインストール。 以降の画面例は IntelliJ IDEA に Python Community Edition プラグインをインストールしたもの。 なお、有償版を使うと他のコンピューターで動作している Python プログラムをデバッガで監視できるらしい。
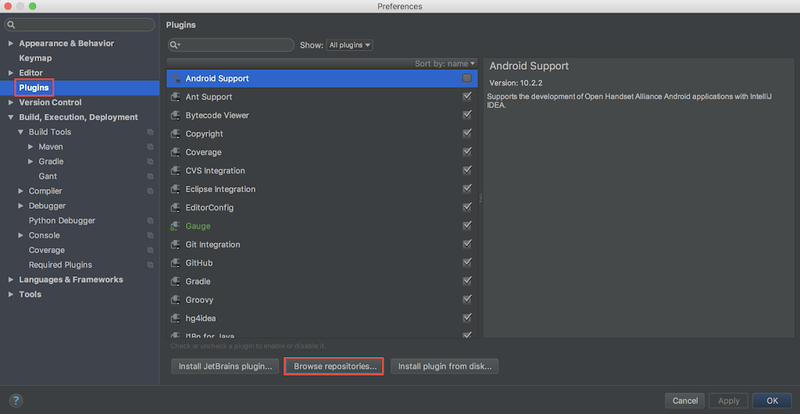
以下はプラグインのインストール。Preferences... から

Python プログラムを作る
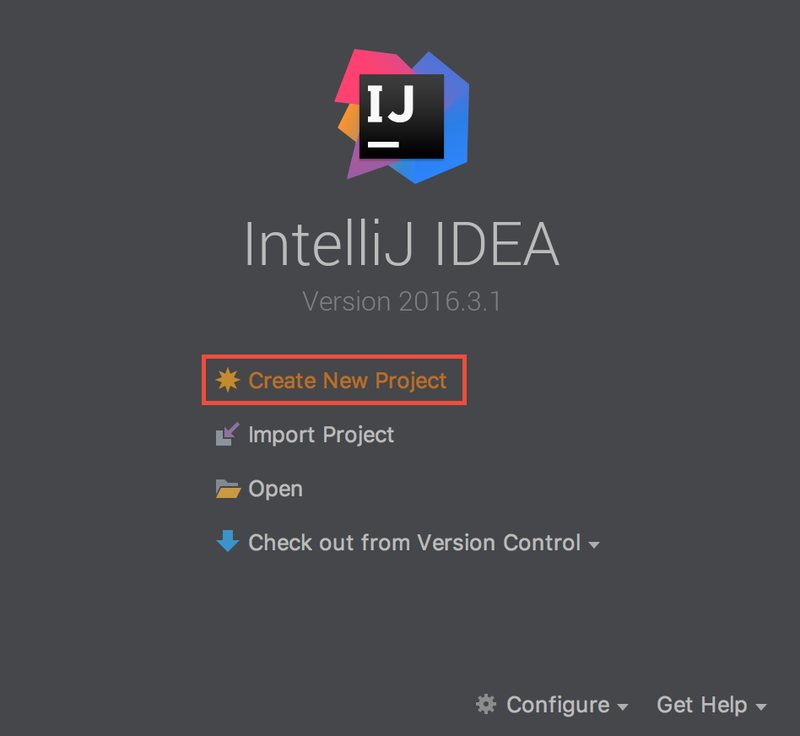
PyCharm (もしくは、IntelliJ IDEA + Plugin) を使用して Python プログラムを作る。
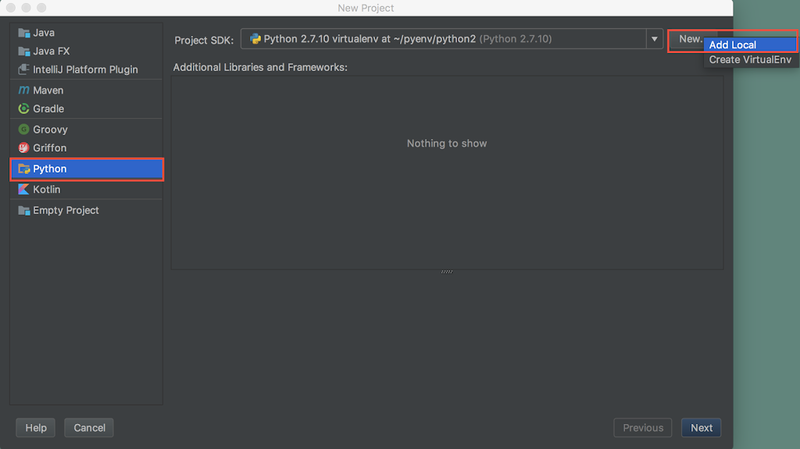
仮想環境を指定してプロジェクトを作成する。仮想環境を指定するにあたって、PyCharm に作成済みの仮想環境を登録する。
PyCharm に作成済みの仮想環境を登録。~/pyenv/python3/bin/python を選択することで登録される。
登録した仮想環境を選択。
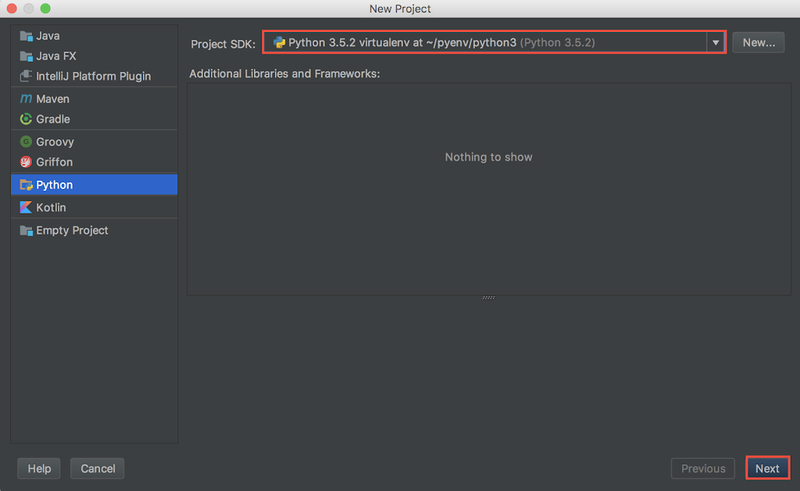
プロジェクト名はお好みで。

Python プログラムを作成して、実行する。

hello.py
from time import sleep

while True:
    print("Hello")
    sleep(1)


Raspberry Pi で実行する
前回、pidep コマンドを作成して Raspberry Pi にログインせずに macOS から実行できる環境を作った。 pidep コマンドを PyCharm で実行できる様にする。
Preferences... を開き Tools > External Tools と移動。
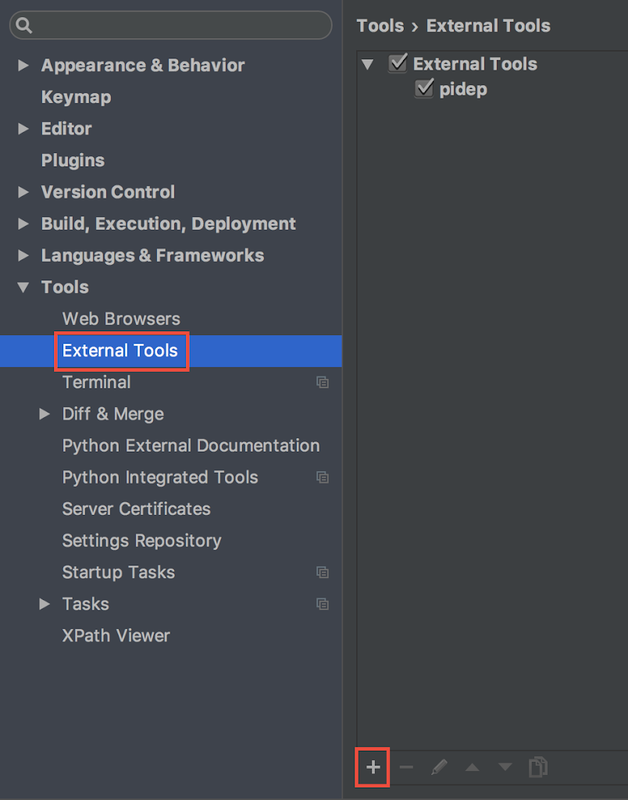

pidep コマンドを使って hello.py を Raspberry Pi で実行する。


再ログインした際に pidep コマンドを実行すると以下のエラーとなることがある。
Permission denied, please try again.
Permission denied, please try again.
Permission denied (publickey,password).
lost connection
このような場合には Terminal で ssh-add コマンドを実行して認証を済ませておく。